RAMP: Raspberry Pi OS/Apache/MySQL [MariaDB]/PHP + ngrok
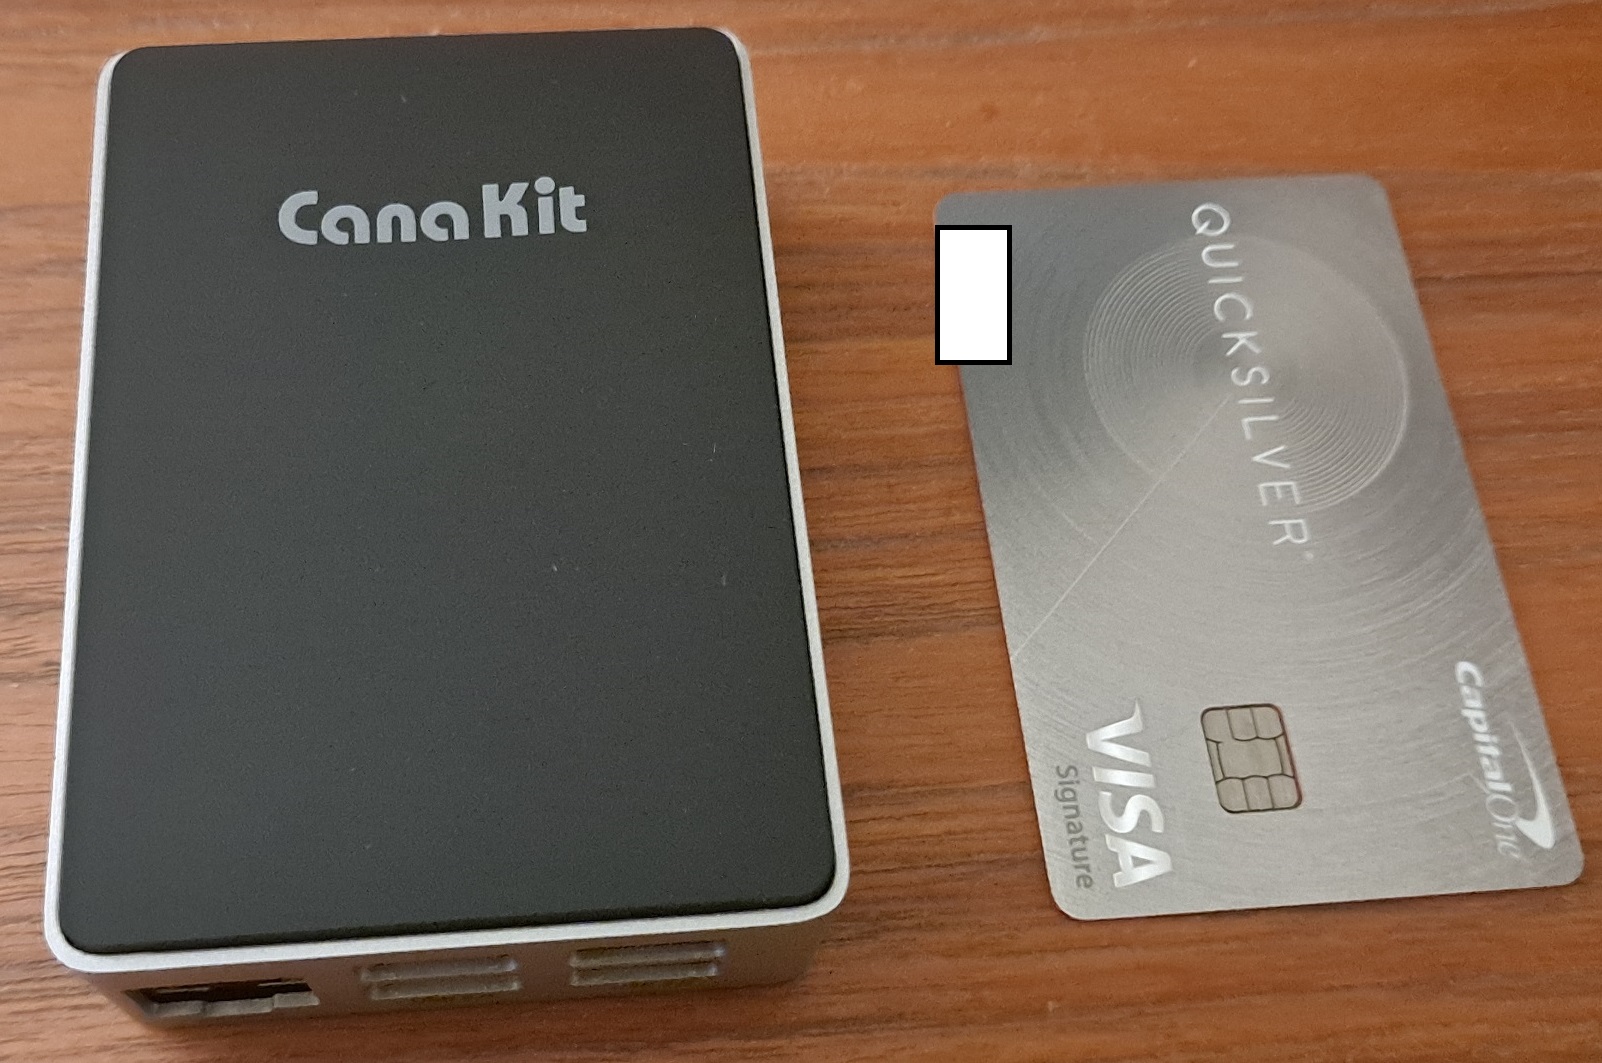
For those unfamiliar with the Raspberry Pi, it is an extremely small yet rather powerful single board computer, which is quite easily capable of running a database-driven webserver and environment. My Raspberry Pi 5 is pictured below next to a credit card to give you an idea of its size. The slick looking aluminum case is from CanaKit.

Most developers today are familiar with the LAMP stack - the most popular webserver environment bundle which includes the Apache webserver, the MySQL/MariaDB database server, and popular scripting languages such as PHP, Perl, or Python. Each letter in the acronym stands for one of its open source building blocks, with the operating system being Linux and the other components described above. This has led to offshoots called WAMP and MAMP for Windows and MacOS, respectively. There is also an excellent cross-platform bundle called XAMPP which has installers for Linux, Windows, and MacOS. RAMP is the name I have given this similar bundle specifically designed for the Raspberry Pi OS (fka Raspbian). I chose to create a new bundle rather than use XAMPP because resources are often constrained on a Raspberry Pi, and XAMPP does include some things which may not be desired - e.g. ProFTPD and phpMyAdmin. In addition, the RAMP bundle includes ngrok - a powerful reverse proxy server that can make your webserver visible to the outside internet without any modification to your router settings. This site includes a shell script to quickly and easily install all of the aforementioned packages, as well as both video and text tutorials that describe the process in detail.
I have seen other tutorials/packages for setting up a database-driven webserver on a Raspberry Pi, but none of them include or explain the use of a reverse proxy. If you want to use your Raspberry Pi as a webserver that can be accessed by anyone, there are 2 issues at hand. 1) You must get the webserver running locally. 2) You must make the webserver accessible outside your home network. There are several other tutorials I have seen which describe 1, but none that explain 2. In order to make a webserver WAN-accessible, you must either adjust your router settings or use a reverse proxy. The reason I have chosen the 2nd option of using a reverse proxy is because everything can be done solely from your Raspberry Pi - you will not need to adjust router settings like port forwarding or the DMZ host. This is especially useful for people who may not have the ability to adjust their router settings, for example in a shared living situation, or with an ISP that provides access exclusively over WiFi. Using the ngrok reverse proxy, you can get a subdomain under one of ngrok's domains with the free service or use your own domain name with a paid plan. This tutorial will show you how to use the free service. Upgrading to the paid plan only requires you doing so from their web app, the process on the Raspberry Pi is the same.
Download
All of the commands below have been compiled into a simple shell script for easy use. Note that line 12 of the script must be edited with your authtoken obtained from your ngrok (reverse proxy server) account. These lines are marked clearly with comments. Below I will describe each of the commands if you wish to perform them manually rather than using the script.
Download shell script to perform all commands below
Just download the file, rename it to ramp.sh, make it executable, and run. To do this in one command, use:
sudo wget https://ramp-pi.com/ramp.sh.txt -O ~/Downloads/ramp.sh && sudo chmod +x ramp.sh && sudo ~/Downloads/ramp.shInstallation
Below is a detailed explanation of each command in the shell script above. You can also view these steps in the video provided. This tutorial assumes that you have already connected your Raspberry Pi device to your home network, using WiFi or Ethernet, and that you have the device's local IP address. If you need help with this initial step, the guide at NextPCB is excellent.
Side note: many people have trouble with the initial set up of the Raspberry Pi because they do not have a spare HDMI monitor lying around. While the network configuration can be performed directly from the imager, it's certainly more intuitive to just boot into the OS like any other Linux box. While most people don't have a spare HDMI monitor, most people do have a smartphone. Yes, it's possible to use your Android smartphone as an HDMI display using a USB-C to OTG cable and HDMI to USB video capture card. The process to do this is described here; you can also install VNC server on your Raspberry Pi if you want to do this wirelessly. There are many YouTube videos on this important step, but if you'd like me to detail this further in a video or text tutorial, let me know and I'll see what I can do.
Now that you've managed to get your Pi online and connected to your network, we can get to work. If you are familiar with Ubuntu's apt package manager, this will be a simple process. First, let's make sure our apt repository is up to date and the system has the latest packages.
sudo apt update && sudo apt upgrade -yThe next thing we need to do is install the Apache webserver. This is actually very simple with the apt package manager. Simply run this command and follow any on-screen prompts if needed.
sudo apt install apache2 -yThis single command installs and configures a basic setup of the Apache webserver, giving your public html directory a default location of /var/www/html. Once we get PHP installed, we will create a sample page to test our installation. So let's install PHP. As with Apache, the installation can be completed in a single command.
sudo apt install php -yNext we will install our MariaDB (MySQL) server. People often wonder what exactly is the difference between MariaDB and MySQL, and why their names are sometimes used interchangably. The simple answer is that MySQL was the product initially included in most LAMP-style bundles until 2010, when it was purchased by Oracle. MariaDB is a fork of MySQL. They're generally interchangeable, but they're not 100% the same anymore. While MySQL is owned by Oracle, MariaDB is under development by some of the original MySQL developers who didn't go to Oracle, or have since left. MariaDB is a backward-compatible improved version of MySQL. It comes with various inbuilt capable features and many security and execution improvements missing in MySQL. In particular, MariaDB is more scalable and offers a higher query speed when compared to MySQL, which is why it's favored by most developers today.
sudo apt install mariadb-server php-mysql -yAfter installing your MySQL/MariaDB server, we need to secure it using the included mysql_secure_installation script, which isn't strictly required, but it's a quick way of configuring your DB server with the most common security settings. This includes:
- Removing root account accessibility from outside localhost.
- Removing anonymous user accounts.
- Deleting the test database, accessible by anonymous users.
- Reloading the user privileges tables.
The command is run as follows.
sudo mysql_secure_installationYou will be prompted for the current root password, which is empty by default. It will prompt you to answer several questions regarding security/accessibility (explained above). You can type 'Y' for each of these. When it asks you if you want to change the root password, you should enter Y and type a password of your choosing. You will see a "Thanks for using MariaDB!" message when the configuration completes.
Next, we want to enable the PHP MySQLi extension and restart Apache2 for changes to take effect. This ensures that your installation of PHP can communicate with your database server via the MySQLi extension.
sudo phpenmod mysqli && sudo service apache2 restartThat's it! The Apache/MariaDB/PHP environment is now installed. We can check this by creating a sample PHP page.
sudo echo "<?php phpinfo(); ?>" > /var/www/html/test.phpYou can then check your installation by pointing your web browser to http://your.local.ip/test.php. If you get a permissions error, this should fix it. If you user a different username than the default ("pi"), make sure to change it in the command below.
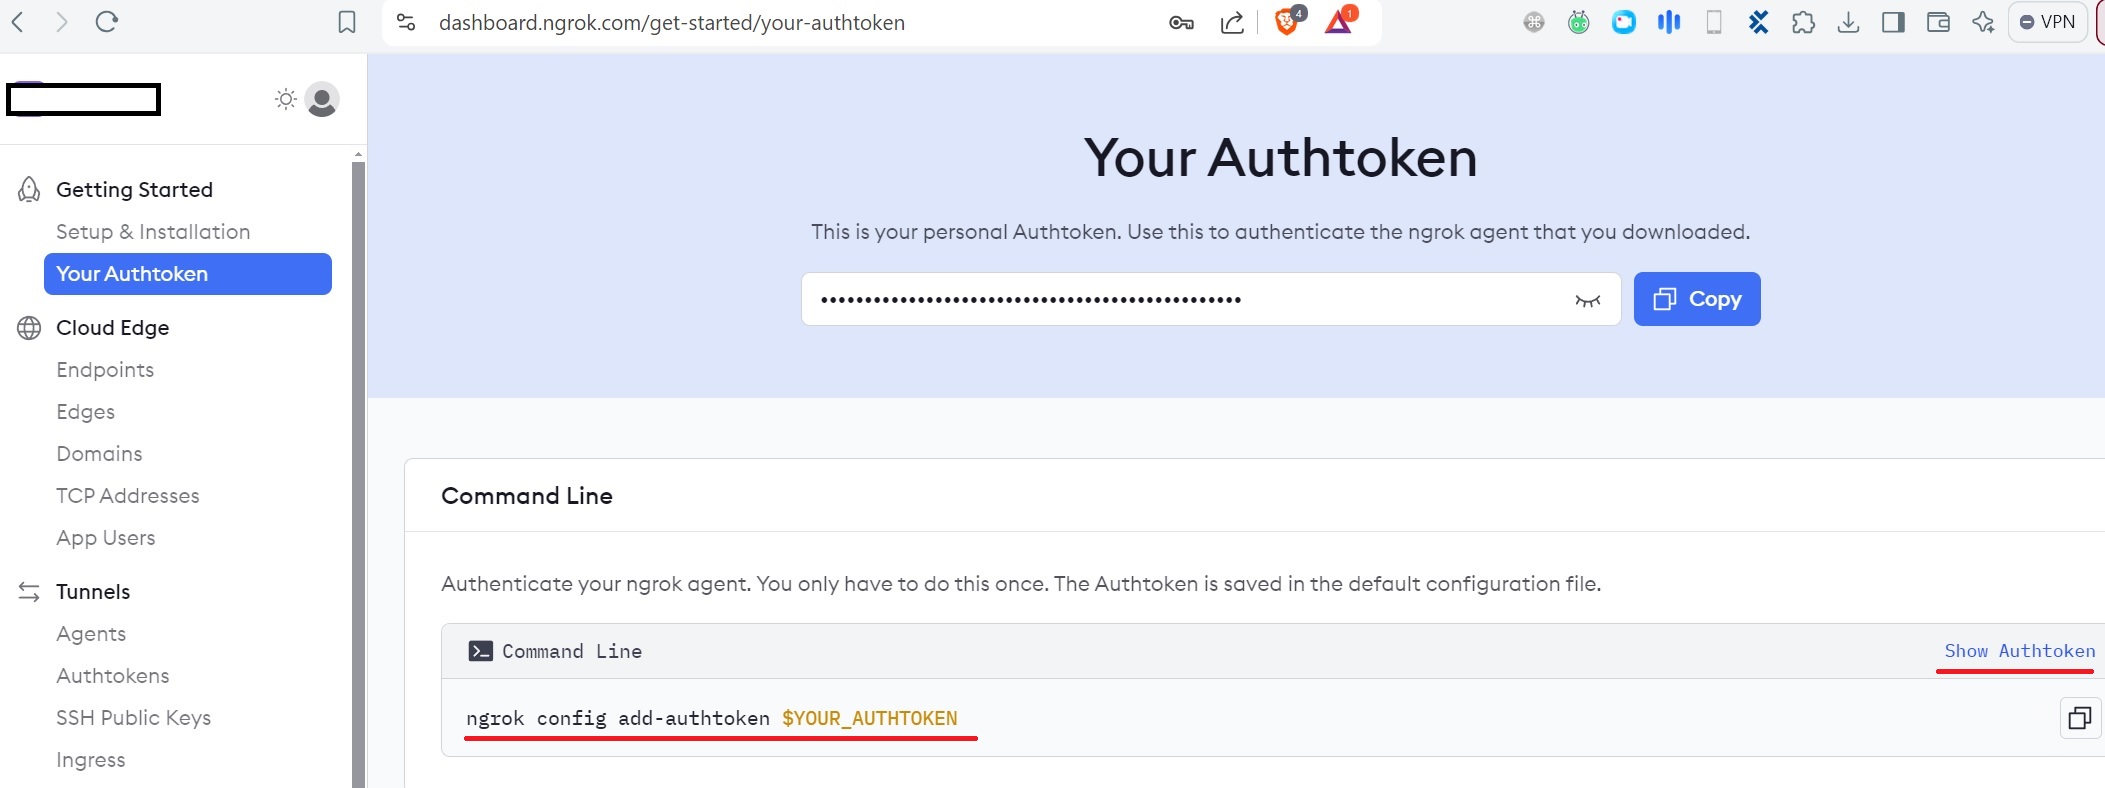
sudo chown -R pi:www-data /var/www/html/; sudo chmod -R 770 /var/www/html/Take a breath. We're nearly done now. The only thing left to do is install ngrok, our reverse proxy. The first thing you will need to do is head to ngrok.com and register a free account. It will ask if you want to setup MFA and a few other questions about intended usage. Verify your account and login. Navigate to the page titled "Your Authtoken" from the left sidebar. The page should look like the image below.

The next thing we need to do is download, install, configure, and run ngrok. We'll start by downloading the latest version.
sudo wget https://bin.equinox.io/c/bNyj1mQVY4c/ngrok-v3-stable-linux-arm64.tgz -P ~/DownloadsNow that it's downloaded, we'll extract and install it.
sudo tar -xvzf ~/Downloads/ngrok-v3-stable-linux-arm64.tgz -C /usr/local/binThe ngrok reverse proxy server is now installed. All that remains is configuring and running it. We now need to configure our ngrok installation to use the authtoken associated with our account. On the "Your Authtoken" page that you navigated to above, click the "Show Authtoken" link (underlined in red) and then copy the command that it shows (underlined in red). It will look like this, but with $YOUR_AUTHTOKEN replaced with the correct value.
ngrok config add-authtoken $YOUR_AUTHTOKENYou will then see a success message of the form "Authtoken saved to configuration file: /home/pi/.config/ngrok/ngrok.yml". All that's left to do now is execute ngrok and point it to your local Apache webserver. The reverse proxy will assign a url to your webserver that can be accessed from the outside internet. If you want to use your own domain, or specify a custom subdomain (under one of ngrok's domains), you'll need to upgrade to a paid plan. The ngrok docs are pretty comprehensive as far as how to do this, but if you'd like to see a follow up video and/or tutorial for custom domains, let me know. This one simple command will bind ngrok to your local Apache webserver running on port 80.
ngrok http 80You'll then see output like the following which includes the url (underlined in red) that points to your webserver.

That's it! Your webserver can now be accessed outside your local network by using the provided url. If you have any trouble or have other questions/comments, feel free to email me or leave a comment on the YouTube video. Hope that was helpful!
Pre-configured Hardware
A few people have asked me if I'd be willing to pre-configure a Raspberry Pi with the RAMP package described above and sell it to them. I want to note that this is completely legal and allowed by the license, and has been discussed at length on the Raspberry Pi forums. While I'm not crazy about the idea, I do understand that there are people who would like to use their Raspberry Pi in this way, but simply don't have the time/effort that would be required to install it themselves. If it's something you need, get in contact with me and we'll try to work something out. This package works on basically any model of the Raspberry Pi, including models 1-5 and Zero. It will not work on the Pico as that is more like an Arduino board and does not run Raspberry Pi OS. If you're having trouble just get in contact with me and I'll try to help. I'd rather teach you how to do it than just do it for you.
Contact